Posts by VDm

    C3 Control Panel

    The C3 Control Panel is an application to remotely control KUKA robots via the C3 Bridge Interface Server or KUKAVARPROXY.

    Features

    • KRL Variable Control
    • Variable Watch List
    • Actual Position Display
    • Jog, the manual control of robot movement (EXPERIMENTAL)

    System Requirements

    • Windows XP SP3 or later
    • DirectX 9.0c
    • Xbox 360 Controller Driver for Windows (optional)

    Screenshots

    Actual Position

    actual_position.png

    Watch List

    watch_list.png

    Jog

    jog.png

    Download Links

    Repository (license information only): https://github.com/ulsu-tech/c3bridge-client

    Binary (Windows XP or later): https://github.com/ulsu-tech/c…v1.0/C3.Control.Panel.zip

    I assume that the amount of RAM is more important than the access speed. The fact is that on KRC4 VxWorks starts its work AFTER Windows 7 is booted (this happens with the UploadRTOS.exe application).


    VxWorks may not boot at all if, for example, there is no free processor core for it. I have had this happen because the process of recovering Windows 7 from the image has been done without any further reconfiguration. And Windows 7 was running on both cores available.


    A similar situation can theoretically happen with RAM because UploadRTOS must correctly allocate the address space for the second operating system.

    Could it be the result of a network problem? Do you connect your laptop directly to OfficePC? Or through a network switch, router or chain of switches?

    Unfortunately, I don't have the VRP, but I have studied the mechanism of remote control on the HMI side. There is a lot of attention to tracking the state of the connection.

    High-Speed Jogging with C3 Bridge Interface (Server + Control Panel):

    External Content www.youtube.com
    Content embedded from external sources will not be displayed without your consent.
    Through the activation of external content, you agree that personal data may be transferred to third party platforms. We have provided more information on this in our privacy policy.

    on the kukavarproxy is "debug" option where I can see all IN/OUT traffic. Is there (C3Bridge) some equivalent functionality?

    When start i see only messages for connection options on C3Bridge window.

    No, the C3 Bridge Interface does not have this feature. It was designed for very frequent requests. This would inevitably lead to a log overflow in a matter of seconds.


    Can You share C3 Control Panel .

    Unfortunately, no. I am working hard on this software and maybe in the future I will release a freeware version.

    Today I saw your project and I will test the possibilities using a python.

    I will be happy if I can assist in the development or testing of your project.

    Nice. You can try to replace KukavarProxy with C3 Bridge Interface. It's fully compatible.


    does your software meets the requirements of "SPOC"?

    Do you mean Single Point of Control? No, I don't think so. Like the KukavarProxy, my software allows for simultaneous connection of several network clients.

    Greetings everyone.

    I'd like you to meet the project that I've been working on for the last six months.

    It's called the C3 Bridge Interface.

    The C3 Bridge Interface Server is a lightweight network application that allows remote clients to execute requests to the KUKA Cross 3 subsystem and return responses. The application provides advanced functionality and high performance.

    Some distinctive features

    • Well-documented application protocol. It is fully compatible with KukavarProxy protocol, which means that existing client solutions (RoboDK, ROS) can be used.
    • Executes more functions of the KUKA Cross 3 subsystem (in the future I hope to implement all available functions).
    • Controls the execution of a KRL program (you can start/stop/reset your program).
    • High performance. The software is written in C++ and can be compiled using both modern development tools and development tools of the past years (like Visual C++ 6.0).
    • It does not require additional software libraries to be installed in the control system.
    • It starts minimized to tray and does not take up any space on the screen.
    • There are no limits on the number of simultaneous network connections and idle time.
    • The Discovery Protocol for easy identification of the control system in the network.

    Notes

    To confirm the correctness of the created software product functioning, the C3 Control Panel application was developed.

    It allows displaying coordinates of the robot's current position and controlling the movement of individual axes.

    Work on both programs is carried out in parallel.

    Increasing the functionality of the C3 Bridge Interface Server requires the addition of verification functions to the control panel.

    Unfortunately, I am not ready to publish the C3 Control Panel at this stage because of its primitive and debug oriented nature.

    Protocol Specification

    You can download the application protocol specification from the repository here: https://github.com/ulsu-tech/c…face%20Protocol%201.1.pdf

    Download Links

    The main repository: https://github.com/ulsu-tech/c3bridge-server

    Binary (v1.0, Unicode, for Windows 7 or newer): https://github.com/ulsu-tech/c…oad/v1.0/C3Bridge.1.0.zip

    Binary (v1.0, ANSI, for Windows 95 or newer): https://github.com/ulsu-tech/c…1.0/C3Bridge.1.0.ANSI.zip

    License

    The software is licensed under the 3-clause BSD license.

    The full text of the license is available in the repository: https://github.com/ulsu-tech/c…erver/blob/master/LICENSE

    Project Support

    I'm not sure if I can leave a donation link here.

    If you find this project useful, you can thank me with a donation.

    All necessary links can be found in the README.md file and on the home page of the repository.

    I would also be happy to receive your wishes and comments of any kind.


    Best regards,

    Dmitry Lavygin

    PhD, Senior Researcher

    S.P. Kapitsa Research Institute of Technology, Ulyanovsk State University, Russian Federation

    What is the advantageof of this complicated, probably illegal method?

    You need an USB stick, an USB sata adaptor, a CDrom drive and the suitable CD.

    It is much easier to connect the adaptor direct to the kuka harddisk and laptop to use your prefered backup software.

    In my case I didn't have an image of HDD, but had original .wim files instead. That's the reason why I needed original Recovery system.

    Are you sure that publishing instructions on how to hack kuka software should be posted public. Do not get me wrong but as a former KUKA employee i am aware that a lot of Kuka people are watching this forum.


    Fubini

    Ethical and legal issues are left to the discretion of the person using the instructions.

    I don't distribute any source or modified software from KUKA or other companies.

    And obviously, I don't profit from it.

    I have supplemented the disclaimer with lines about this.

    If the KUKA representatives or moderators of this forum see a problem with the existence of these instructions, they can simply delete them.

    Screenshot 4


    Acknowledgements and wishes

    I would like to thank others for help in researching of the original KUKA.RecoveryUSB.

    I would also like to ask the moderators to edit this manual in order to improve the grammar (I'm not a native English speaker) and, if possible, combine several posts into one.

    Screenshot 3


    Step 4. Making RecoveryUSB

    1. Copy whole Recovery subfolder from a hard disk to your USB stick.
    2. Launch patched X:\Recovery\Recovery.exe (where X: is drive letter of your USB stick), KUKA.Recovery application window will be opened
    3. You can change the language to your preferred.
    4. Press Update USB stick button, locate Recovery_3.0.3.0015.cab file for the Update package field, press Update button.
    5. Wait when the creating process will complete, then close KUKA.Recovery application.
    6. Now you need to copy patched Recovery.exe file from your hard disk to USB stick again (it's important).
    7. Your self-made RecoveryUSB is ready.
    8. (Optional) Launch Recovery.exe from the USB stick again, select Expert settings and uncheck Support only KUKA controllers to make it possible to boot and run on any PC.


    Step 5. Making Super Grub2 Disk

    1. Download CD image of universal boot manager from SourceForge.

    2. Burn the image to CD/DVD using your preferred CD recording software.


    Step 6. Booting to Recovery System

    1. Connect a CD-ROM drive with Super Grub2 Disk inserted to your KUKA Robot Controller.

    2. Insert your self-made RecoveryUSB into your KUKA Robot Controller.

    3. Perform reboot or power-on of the control system.

    4. During POST stage of booting (KUKA Logo) press F12 to select boot device.

    5. Select your CD-ROM device from the list and press Enter, universal bootloader will be loaded (see the screenshot 4).

    6. Select Boot manually... ⇒ Disks and Partitions (Chainload) ⇒ (hdX, msdos1) "KRC_ARCHIVE" (where X is a number).

    7. Now your RecoveryUSB system will be loaded (you must see the loading progress bar), you can disconnect CD-ROM drive from your KUKA Robot Controller.

    8. Follow the manual for KUKA.RecoveryUSB.

    Step 3. Patching procedure

    1. This step involves the use of a hexadecimal editor, so if you haven't one you can download free hex editor called Hexplorer from SourceForge
    2. Open Recovery.exe file from Recovery subfolder (Step 1.5) in the hex editor.
    3. Use Edit ⇒ Find... (Ctrl+F) with hex chain of bytes: 4B0055004B0041005F00550053004200 (it means KUKA_USB encoded as UTF-16 little-endian wide string).
    4. The hex editor will jump to offset where 0x17DDB0 is a beginning of the located chain, and 0x17DDBF is an ending of the chain (see the screenshot 2).
    5. Now edit the chain by overwriting first three letters of KUKA_USB to just USB (or your specific substring from Step 2.6), subsequent letters must be zeroed (see the screenshot 3).
    6. So the hex chain 4B0055004B0041005F00550053004200 is now replaced by 55005300420000000000000000000000.
    7. Save the file (File ⇒ Save), now you're ready to make RecoveryUSB.


    Screenshot 2

    Running KUKA.RecoveryUSB from any USB Flash Drive

    Disclaimer

    Everything you do, acting according to this manual, you do at your own risk.

    I'm not responsible for any loss or damage arising from reading of this manual.

    All legal liability associated with making changes to the software rests with the person making the changes.

    I offer this manual only for those who have an original KUKA.RecoveryUSB stick that does not work or has failed.


    Prerequisites

    1. IBM PC-compatible computer with Microsoft Windows 7 or higher.
    2. USB CD-ROM drive or SATA CD-ROM drive with SATA-to-USB adapter.
    3. Couple of writable CD/DVDs.
    4. USB Flash Drive with 1 Gb of memory at least.
    5. KUKA Robot Controller 4 (I did my experiments on KRC4 compact).


    Step 1. Dealing with archives

    1. Download KUKA.Recovery_V3.0.3_UpdatePackage.zip file from http://www.update-recovery-usb.kuka-robotics.com/.
    2. Open the downloaded file in any archiver application (I prefer free 7-Zip Archiver).
    3. Inside the archive you will see Recovery_V3.0.3_Build0015 subfolder which contains Recovery_3.0.3.0015.cab file, extract that file to a folder on your hard disk.
    4. Recovery_3.0.3.0015.cab file is an archive too, so open that file in your archiver application.
    5. Extract whole Recovery subfolder from the archive to a folder on your hard disk (and don't delete Recovery_3.0.3.0015.cab).


    Step 2. Collecting information

    1. Physically remove any USB sticks from your system except one which planned to be self-made RecoveryUSB (If there is no plugged USB sticks in your system, just insert one).
    2. Open the Device Manager (In Windows 10: right click on Start Button ⇒ Device Manager, or right click on This PC ⇒ Properties ⇒ Device Manager).
    3. In the Device Manager's tree locate Disk drives branch, expand it, locate your USB stick device (you must distinguish that from any other drives on your machine).
    4. Make a double-click on your USB stick device, device properties window will be opened, select the Details tab and Friendly name property from drop-down list.
    5. Now read the value, in my case it's Generic Flash Disk USB Device (see the screenshot 1).
    6. If the Friendly name of your device contains substring USB then you can just continue read this manual step-by-step, but if not you'll need to choose any unique three letter substring from the value and use that on the step of patching procedure (or you can replace a USB stick to one which Friendly name value contains USB substring).


    Screenshot 1

    I think for booting from USB-flash the bios checks some informations of the controller chip in the USB device, like VID / PID and some more.You even can't change this with an acronis backup of the whole flash drive.

    So i am amazed about the fact that your controller booted from an attached CD-ROM.

    So far, I've learned this:

    • My KRC4 system doesn't boot from any USB non-optical disk drive (I tried USB stick and regular HDD with SATA-to-USB adapter)
    • System does boot from CD-ROM attached by SATA-to-USB adapter (in MBR mode)
    • System does boot from any USB stick which formatted as FAT32 partition contains 64-bit EFI loader (in UEFI x64 mode)
    • System does boot from secondary HDD or CD-ROM directly connected via SATA (in MBR mode)


    Also today I was able to create a bootable CD that boots successfully but Recovery.exe doesn't start due to an incorrect letter assignment of the CD file system (Windows PE expects Recovery.exe to be found in the C:\Recovery folder but in fact it is in the D:\Recovery).


    A temporary workaround: Use a flash drive clone and a CD at the same time. Windows PE will boot from the CD, and then launch C:\Recovery\Recovery.exe from the USB flash drive.

    Thank you, so I have to think hard about why KRC refuses to boot from the flash drive's MBR.

    The system does not even try to transfer control to the boot sector code.

    I wrote into the first sector of the flash drive 512 bytes of special code to confirm the booting stage.

    It runs and works on any PC, but not on KRC4.

    Greetings everyone.

    I have a KRC4 compact control system that requires the operating system to be reinstalled (don't ask why).

    I found that the system drive contains three volumes which contains:

    1. (Drive C:) Operating system, KRC folder, etc...
    2. (Drive D:) KSS installation files
    3. (Hidden) Two .wim files with images of drives C and D


    After studying the documentation and this forum, I realized that I needed KUKA.RecoveryUSB.

    However, this flash drive was not bundled with my robot.


    So I started looking for alternative methods and solved the problem by running a customized Windows PE image.

    Moreover, Windows PE refused to boot from a USB flash drive, but it would boot perfectly from a CD (the drive was connected via a USB-SATA adapter).

    I successfully deployed the main .wim-file through the deployment system inside Windows PE.

    The second file was unpacked through the dism console utility.

    The resulting system was successfully booted and started the necessary components, but the UploadRTOS.exe application ended with an error about the inability to deploy and start VxWorks.

    I spent some time looking into this issue, and found a solution by setting a limit on the number of processor cores that Windows can use.

    Intermediate conclusion: do not do like me if you do not understand exactly what you are dealing with.


    Thus, the control system was fully operational after this "manual" recovery.

    I went through the commissioning procedure and the robot started functioning without any problems.


    After a while I returned to the question of obtaining KUKA.RecoveryUSB and found the site where I downloaded a zip package with Recovery_3.0.3.0015.cab file inside.

    Then I followed the instruction from the Workinstruction_KUKARecovery30_Update_EN.pdf file.

    Of course, when launching Recovery.exe from a regular (non-KUKA) flash drive, the application refused to run.

    So I forced it to work.

    Now the Recovery.exe program has successfully created a "self-made" KUKA.RecoveryUSB for me.


    The resulting flash drive works perfectly on any computer that supports the classic MBR (Master Boot Record) boot method (including UEFI systems).

    But KRC4 refuses to boot MBR code from USB flash drives.


    I see three main ways to solve this problem:

    1. Copy my KUKA.RecoveryUSB to a CD disk (CD booting is no problem on KRC4, but I don't want to connect an external CD-ROM drive to the system again)
    2. Set my "self-made" USB flash drive to pure UEFI boot mode (I have already made sure that KRC4 boots successfully from any USB stick if it provides UEFI booting, I suspect that the original KUKA.RecoveryUSB does so)
    3. Using a special program from Fujitsu (motherboard manufacturer KRC4), and try to change UEFI settings regarding security of booting from USB flash drives with MBR


    Ideally, I would like my flash drive to repeat the functionality of the original KUKA.RecoveryUSB.

    I suppose that probably nobody will give me the Acronis-image of the original flash drive, but then at least I would like to know the type of its file system partitioning: GPT or MBR.

    This can be done in the following way:

    1. Insert KUKA.RecoveryUSB into USB slot on your regular PC (not KRC)
    2. Open "My Computer" ("This PC" in newer versions of Windows) and search the drive (usual it labeled "KRC_ARCHIVE")
    3. Use right click on the drive icon to open context menu and select "Properties"
    4. In the drive properties window change tab to "Hardware" and select corresponding physical device (your device must be named "KUKA_USB" or something like that)
    5. Click on "Properties" button below
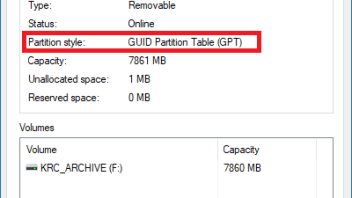
    6. In the device properties window select "Volumes" tab and press "Populate" button (see my screenshot below)
    7. Tell me the value of "Partition style" parameter or just show a screenshot of whole window


    I would be happy to see your comments and suggestions.

Advertising from our partners